What if you could experience the panorama of a lifetime, sense the exhilaration of conquering heights, and feel the solace of nature, all within a couple hours? Visit Mount Major and feel like a titan standing at the edge of untamed wilderness. The question, however, remains: “How long would this venture truly take?” Let’s delve into it together. Just as one can’t quantify the enjoyment derived from a perfectly brewed cup of coffee by its brewing minutes, gauging the time required to hike Mount Major isn’t merely a question of hours. It depends on various factors that fluctuate within each exciting adventure.
The duration of a hike up and down Mount Major can vary depending on factors such as fitness level and pace. On average, it takes about 2-3 hours to complete the full loop trail, which covers approximately 3.5 miles. However, some hikers may take longer or shorter than this estimate, so please plan accordingly and bring appropriate equipment and supplies.
Overview of Mount Major
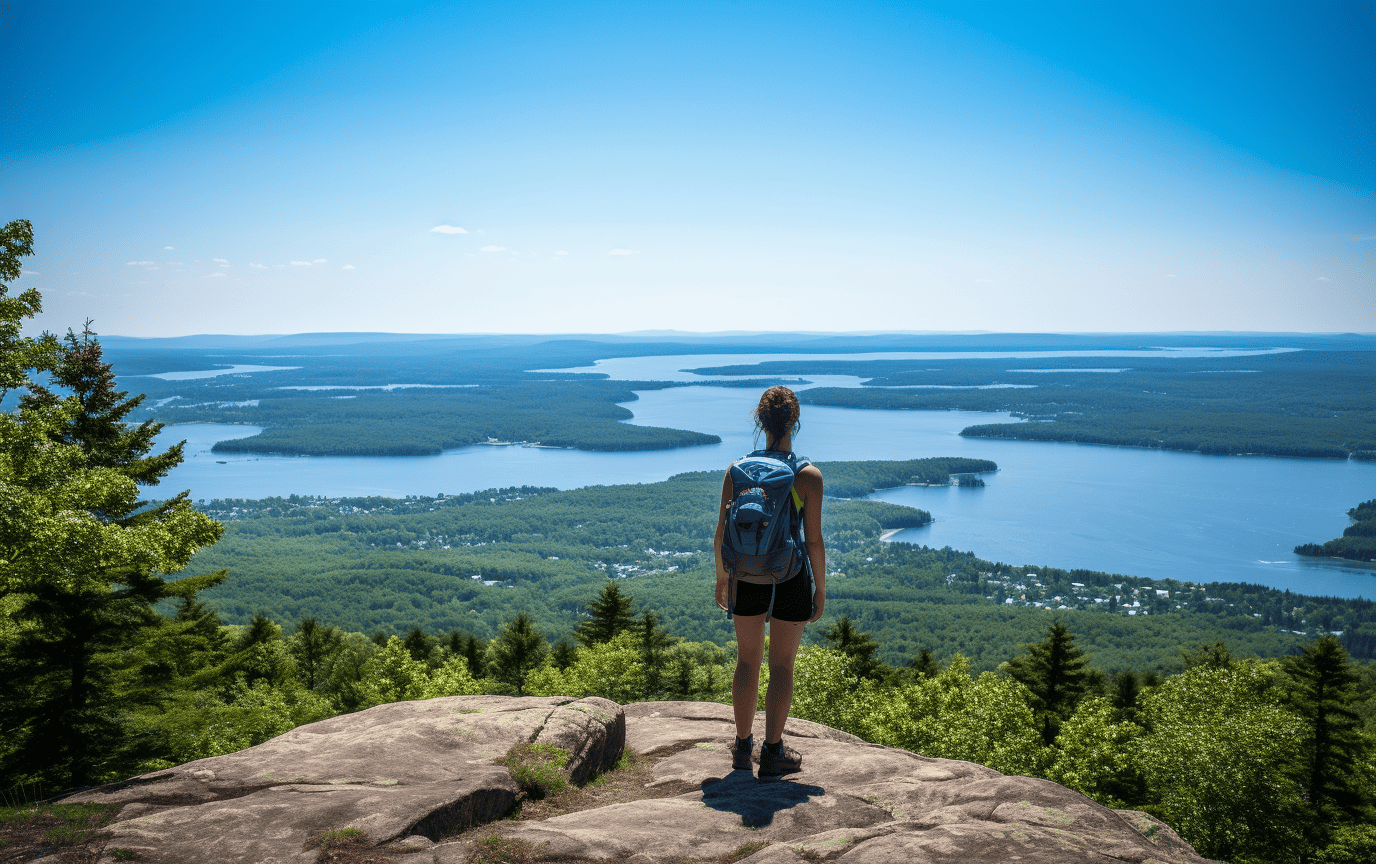
If you’re looking for a scenic hike in the Lakes Region of New Hampshire, Mount Major is definitely worth considering. Situated in the Belknap Mountains range, this 1,786-foot peak offers amazing views of Lake Winnipesaukee. Mount Major is located in Alton, NH on Route 11 which makes it easy to find and convenient to access.
Many hikers have claimed that climbing Mount Major is one of the most enjoyable hikes in New Hampshire because of the different trails that cater to various skill levels. What’s more impressive is that most trekkers who make it to the top testify to its breathtaking view of the lake and mountain range.
The summit of Mount Major isn’t just for seasoned hikers, but also caters even to novice hikers who are willing to explore and push themselves outside their comfort zone. Like how businesses often encourage their employees to step out of their routine work habits and attempt new initiatives that may lead to success down the road.
As per its name, “major” best describes this mountain as it towers above many buildings making it easy to spot from miles away. Despite its height, hiking up from any trail doesn’t take too much time or energy, especially if your fitness level is decent.
Whether you prefer solo hiking or with friends/family by your side, everyone who has walked up this mountain can attest that it’s an excellent way to unwind after a long week at work. However, within different seasons like winter or summer, hiking experience may be enhanced or complicated due to weather conditions.
Now that we’ve covered an overview of what makes Mount Major special, let’s delve deeper into some vital information about what you need to consider before embarking on this hike.
Elevation and Distance
One of the most noticeable things about Mount Major is its proximity to the road, making it accessible by car. From this parking area, most hikers tend to head up the trailhead and make their way up the mountain. The peak itself has an elevation of 1,786 feet above sea level, with various routes that can be used depending on your skill and type of hike you’re considering.
Comparing the height to that of a tall building in a busy town center could help conceptualize how high and rewarding this hike’s summit is. Once you reach its top, you’ll quickly understand why many people consider Mount Major as one of their favorite hikes in New Hampshire.
While hiking seems like a simple workout activity where distance walked defines the duration taken to complete it, such isn’t the case with Mount Major. The different trails leading to the summit offer contrasting distances while taking varying amounts of time based on physical strength and fitness level.
For example, if you prefer a more challenging hike via a steep trail, expect to spend around one hour or more up and down. But if you are looking for a less challenging route that is family-friendly, there is an easier terrain that will only take approximately 45 minutes to ascend.
While hiking Mount Major can be comfortable for some hikers who have done it before multiple times regardless of weather conditions, wind speed may occasionally cause trouble due to lakeside breeze effects. On certain days depending on weather situations like snow or ice accumulation on trails during winter seasons or heavy rains during fall months, hiking distance is extended at slower paces hence may take longer than average timeframes.
Now that we have outlined the elevation and distance details of hiking Mount Major let us dive into other vital factors that hikers need to take into account before embarking on this popular trail.
Difficulty and Trail Terrain
Hiking Mount Major presents a moderate level of difficulty, with a few steep sections and rocky terrain. The Blue Trail is a relatively gentle path that leads hikers through the woods to the summit. However, towards the top, it becomes quite steep and rocky. From there, hikers can access the Orange Trail, which provides a more challenging ascent to the summit.
The terrain on both trails varies in places from firm dirt to eroded rock and loose stones, which can be quite slippery after rain or snowfall. Hikers should wear sturdy hiking boots with good traction. Trekking poles can provide additional support on steep inclines and uneven terrain.
When I hiked Mount Major for the first time, I learned about the importance of proper footwear quickly. I had worn my everyday sneakers not realizing how treacherous the trail could get in parts. During one particularly steep section nearing the top, my foot slipped out from under me unexpectedly on a patch of wet rock. After that fall, I made sure to wear appropriate footwear every time I hit a mountain trail.
Despite its moderate level of difficulty, caution should always be taken on Mount Major due to the unpredictable nature of terrain conditions and potential hazards like loose rocks or slippery trails.
It’s easy to underestimate the challenge of a hike like Mount Major if you’re an experienced hiker who regularly traverses higher peaks. While it may not be as dread-inducing as some of New Hampshire’s most imposing mountains, it still demands preparation and focus as hikers take on its muddy trails.
Now that we’ve discussed the difficulty level and trail terrain of Mount Major let’s talk about some key landmarks and sightings you might encounter while hiking this beautiful mountain.
Key Landmarks and Sightings
One significant feature you’ll notice right away is the abundant tree cover, which keeps the trail shaded and cool. The trek offers many memorable views of Lake Winnipesaukee, charming surrounding towns, and other distant peaks.
At the halfway point along the Blue Trail, hikers will find a trail post with helpful information about the terrain and a map of the area. This is also a great place to take some rest as it provides an excellent view of Lake Winnipesaukee.
My favorite landmark while hiking Mount Major is surely the benchmark marker on the summit just north of the main observation point. Posing for photos with friends there and knowing we had earned our view from hours worth of hiking was an incredibly proud moment for me; one I’ll always remember.
A word of caution: don’t get too close to ledges or steep vertical drops on any of the trails. While many parts of Mount Major offer breathtaking views, they can easily become dangerous if not approached with care.
Some might argue that there are few distinctive sights beyond sweeping glimpses of Lake Winnipesaukee on this hike. However, in my experience, watching winter turn to spring through Mount Major’s diverse treescape adds to this journey’s unique charm.
Hiking Mount Major is like opening a present – you start at the bottom with little idea what lies inside, then gradually peel back layers until you finally see all that’s hidden within at its summit. Each step forward unlocks new surprises.
Now that you have a better understanding of Mount Major’s key landmarks and trail terrain let’s move further into how you can prepare yourself before embarking on this awe-inspiring journey by discussing essential preparation methods and safety measures to take while undertaking this task.
Estimating Hiking Duration for Mount Major
One of the most common questions asked by hikers planning to scale Mount Major is, “how long does it take?” This question is understandable since knowing the approximate time required to conquer this mountain can be helpful in planning. The time taken to hike Mount Major varies depending on different factors that come into play. In this section, we’ll explore some of these factors to make it easier for you to estimate how long it will take to complete the trail.
To get an idea of the duration required for hiking Mount Major, let me share my experience. I hiked Mount Major with a group of friends, and we started early at 8:00 am from the trailhead at Route 11 in Alton. It was a beautiful day with clear skies and cool temperatures. We took several breaks along the way and completed the hike in approximately four hours, including the time spent resting and enjoying the beautiful views.
Typically, hiking Mount Major takes between two and four hours, depending on your level of fitness, weather conditions, and whether you take breaks or not. The distance of the trail is 3.5 miles round trip, and it has an elevation gain of 1,150 feet. This may seem like an easy hike based on its length and elevation gain; however, other factors come into play when estimating hiking duration.
Some experienced hikers can complete this trail in less than two hours while others may take over four hours. So even though distance and elevation are significant factors in determining how long it will take to hike up Mt Major, they’re not the only ones that matter. Other critical factors that influence your timing include your fitness level and weather conditions.
Before we delve into these elements deeper let’s take another factor that affects hiking duration on Mt Major.
Factors Influencing Time: Fitness Level and Weather
As hinted earlier, there are two factors that determine the time taken to complete a hike up Mount Major: one is weather, and the other is your level of fitness. Let’s look at each of these factors more closely.
Imagine you’re running a race in adverse weather conditions like heavy rain or snow. This kind of weather wouldn’t only slow you down, but it would also require more energy from your body due to the slippery terrain. The same goes for hiking up Mount Major. Harsh weather conditions such as high temperatures, humidity, or a rainy day can slow you down or make the trail even more challenging to navigate than usual.
Your level of fitness dictates your hiking ability when tackling Mount Major. If you’re an experienced hiker in excellent physical condition, you will likely complete the trail faster than an inexperienced person who isn’t in good shape.
For instance, if you have limited experience hiking, and physical activity isn’t part of your daily routine, it may take longer to get to the summit because you’ll need frequent breaks to rest along the way. However, if hiking is an activity you engage regularly with a high level of fitness strength and endurance, completing Mount Major may seem like a breeze.
Note that fitness levels vary from individual to individual. An experienced hiker who’s not currently in perfect shape may struggle more than an inexperienced person accustomed to regular physical workout sessions; hence a doubtful classification between them is necessary.
All things considered; estimating how long it will take to hike Mount Major is subjective. However, understanding how different factors come into play can help plan your trip better and make sure nothing catches you off guard.
- The average time taken to complete the hike of Mount Major in New Hampshire, US, is approximately 2-3 hours, depending on individual’s speed and condition.
- According to data collected by AllTrails, Mount Major’s trail is approximately 3.4 miles long (round trip) with an elevation gain of about 1,150 feet.
- Recent studies show that an average hiker moves at a speed of roughly 2 miles per hour on flat or mildly sloping terrain like that of Mount Major’s trail.
Breaks and Pace Management
One of the most important factors in estimating your hiking duration is managing your breaks and pace. Taking appropriate breaks to rest and refuel is essential to reaching the summit, but it can be difficult to know exactly how long to linger at each stop. Similarly, maintaining an appropriate pace is key to preventing fatigue and injury, but adjusting your gait on various sections of the trail may not come naturally. Here are some tips for break management and pacing during your Mount Major hike.
When planning your breaks, consider the length and intensity of the hike. For Mount Major, a great starting point is to pause briefly every thirty minutes or so during your ascent. This gives you a chance to catch your breath, rehydrate, stretch any tight muscles, and enjoy the view without getting too bogged down. As you near the summit you might want to take more frequent breaks or longer rests depending on how you feel.
It’s also crucial to manage your pace during those thirty minute sessions, as well as throughout the hike itself. In general, it’s better to choose a consistent pace or rhythm rather than pushing yourself hard for shorter intervals then slowing down considerably for longer ones. Many hikers use a technique called “hiking by feel” where they start with an easy pace and adjust as necessary based on their breathing rate and perceived exertion.
Think of pacing like a marathon runner who starts out strong but eventually slows significantly due to fatigue. Rather than burning all your energy early on the trail, setting a comfortable tempo from the start will allow you to maintain that speed for longer periods of time.
However, this technique is not foolproof – depending on your individual fitness level and level of experience a slower or faster pace may be more appropriate. If you’re feeling really good at the start of the hike, it’s okay to go a bit faster, so long as you’re still able to take breaks consistently and remain well-hydrated.
During your breaks, take advantage of designated rest areas like benches or ledges with nice views. This can be especially helpful for those who need extra motivation to keep going – setting small goals like “I’ll make it three more bends before taking a short break” can give you something to focus on during the climb.
Consider break management like navigating a river with rapids. If you don’t pause to assess the conditions every now and then, you might miss important opportunities for rest or nourishment that will help you reach your destination safely.
Now that we’ve discussed how to manage your pace and breaks along the way, let’s dive into what essential preparations you should make before embarking on this beautiful hike.
Essential Preparation for the Hike
Before setting out on any hike, but particularly one with an elevation gain such as Mount Major, it’s essential to prepare appropriately. Proper gear is crucial, but understanding safety measures and being aware of what kind of trail terrain and challenges to expect is also important. Here are some things to consider when preparing for your Mount Major hike.
The well-being of hikers should always be top-of-mind – regardless of skill level or experience. To safely navigate Mount Major’s steep sections and variable terrain, hikers will need reliable footwear with ankle support as well as comfortable clothing appropriate for the weather conditions. Bringing extra layers just in case is always recommended.
Additionally, it’s important to bring enough food and water (at least 2 liters) for your journey. Trail mix and protein bars are great options for quick, easy-to-pack snacks that will fuel your body without weighing down your backpack or pockets.
Safety is vital on any hiking trail, and Mount Major does have some technical features that require extra care. Be sure to research any necessary equipment for the trek before heading out, such as a headlamp or bear spray if hiking early in the day or alone.
Though considering safety measures before you begin your hike may seem obvious to some, others may be less experienced or may overestimate their capacity. However, taking extra precautions doesn’t need to add to stress levels – many hikers find enjoying a well-earned meal, watching animals in their natural habitat and taking in views they might not otherwise see while enjoying the outdoors is more than worth the effort of being prepared with appropriate gear. Also: Don’t forget your insurance information in case of any unwanted accidents!
Preparing for your hike is more similar to prepping your vehicle for a big road trip than you might think. Checking wear and tear on your shoes is as important as checking tire pressure on your car, so that you can avoid the risk of having it breakdown or damage which on a trail could be much more complicated than when you’re driving on main roads.
By following these preparation guidelines, hikers will enjoy a safer and more comfortable experience while at Mount Major. Nonetheless, there are other considerations we’ll explore regarding navigation and route planning that are specific to this mountain.
Safety Measures and Gear Checklist
Hiking is an invigorating activity that brings you closer to nature, providing a healthy dose of exercise coupled with breathtaking views. However, like any other outdoor activity, hiking comes with its own set of risks and dangers that could leave hikers vulnerable if not properly prepared. Therefore, it’s critical to prioritize safety while preparing for a hike up Mount Major, one of the most popular hikes in New Hampshire.
A few years ago, I went on a hike up Mount Major without taking necessary safety precautions. My hiking companion and I did not carry enough water or appropriate gear for the weather forecast that day. By the time we reached the summit, we were exhausted and dehydrated. The chilly winds made us further susceptible to hypothermia, which could have turned into a life-threatening situation if we had not come across some helpful hikers who lent us warm clothes.
To avoid similar situations, hikers must take measures to prepare themselves by following essential safety tips when planning their trip up Mount Major. Firstly, consider the weather conditions during the time of your hike and pack according to those conditions. Even if it seems sunny and warm at your starting point or base campground, weather conditions can vary significantly as you ascend higher on the trails.
If you are planning to go hiking during colder seasons or cooler times of the day when temperatures may drop substantially, pack extra layers of clothing such as thermal base layers, fleece jackets, gloves, and hats to keep yourself warm and ward off hypothermia.
Some of you might be thinking: “I don’t want to carry a lot of weight; it will only slow me down.” While this argument has merit from an athletic perspective, remember carrying additional gear is crucial for emergencies or unexpected changes in weather patterns that can occur so quickly on mountain trails.
In the same way that you wouldn’t want to drive your car without a spare tire, carrying extra layers and safety equipment is non-negotiable on a hike. It’s better to be over-prepared than underprepared, especially when it comes to hiking in mountainous terrain where weather conditions can change quickly.
With that in mind, here’s a checklist of essential gear and safety precautions you should consider when planning your hike up Mount Major.
– Water: Carry at least 2 liters per person, especially during warmer months.
– Navigation: Bring a map and compass to navigate trails confidently. Familiarize yourself with topographical maps of the area before setting off for your hike.
– Food and Snacks: Pack granola bars, nuts, energy gels, or sandwiches for snacks along the way. Opt for high-energy foods like carbohydrates that provide energy.
– Headlamp or Flashlight: Always carry extra batteries as well so that you can navigate trails safely even in the dark.
– Cellphone Charger/Battery Pack: A charging device or backup battery pack will keep communication channels open with the outside world if needed.
– First Aid Kit: Your kit should include bandages, gauze, painkillers, personal medication prescriptions, and antihistamines for emergencies.
– Sun Protection Gear: Invest in sunscreen with SPF 30+ and sunglasses to prevent sunburns or snow blindness from reflective sunlight.
– Emergency Whistle : Carrying a whistle is also useful; it can help attract attention from other hikers in case they are lost or injured along the way
– Proper Hiking Shoes: Choose sturdy hiking boots or shoes with good ankle support and traction when navigating rough terrains.
Hiking up Mount Major can be a thrilling experience but requires appropriate safety precautions to ensure hikers do not fall victim to the dangers lurking on the trail. Being adequately prepared is crucial, which includes carrying extra layers of clothing, ample water supply, proper hiking gear, navigation aids, food and snacks, a whistle, and a first aid kit. Hikers should prioritize their safety by researching weather conditions before embarking on the hike and keeping communication channels open with a mobile charger or backup battery pack. While it may add weight to your pack, carrying additional gear is vital in emergencies on mountain trails.
Navigating Mount Major: Route Planning and Map Reading
Mount Major is one of the most accessible hikes in New Hampshire due to its proximity to main roads and parking areas, but it can get confusing for hikers who are new to the trail system. Therefore, it’s essential to plan your route beforehand and have a basic understanding of the trails and landmarks on Mount Major before you hit the trails.
A shortcut or wrong turn can lead you off course without proper route planning. I once took a circular loop trail that was longer than necessary, completely bypassing the main viewpoint on top of Mount Major. Unfortunately, I ended up hiking past nightfall, adding extra hours to my outdoor excursion.
Before setting out on any hike, including Mount Major, familiarize yourself with maps and relevant route information. Check hiking guides for details on the starting points, trail difficulty levels, estimated hiking times, and land markers to help you plan your journey better.
Identifying key landmarks such as Lake Winnipesaukee on one side and Mt Kearsarge in the distance from the summit can provide orientational cues when hiking up multiple peaks. Additionally, hikers should pay attention to colored trail markers if they want to avoid getting lost or wandering off-trail.
You might be considering using GPS devices or smartphone apps instead of paper maps for navigation like Google Maps or alltrails.com. However convenient this technology is, it shouldn’t replace traditional navigational tools; devices may run out of charge or lose signal connections in high elevation areas.
Technological advancements should only supplement not substitute preparation skills and navigating know-how.While online maps are a good backup tool in case of emergencies; paper maps remain accurate always- whether rain or snow!
With that said, here are a few additional tips to help you navigate Mount Major safely:
– Choose an appropriate trail: The Brook Trail offers easier ascents while Mount Major Trail allows for more challenging hikes.
– Stay on Marked Trails: Always stick to marked trails. Create a basic plan and stick to it from the beginning, making sure you avoid shortcuts.
– Be Prepared for Emergencies: When navigating Mount Major, hiking with friends or family is advisable in case of emergencies. Carry essential items, including a charged cellphone, whistle, first aid kit, and plenty of water.
– Plan Your Starting Time: Start your hike early enough to allow for ample daylight hours to make it up and back down before night sets in. Check weather reports before setting out on your hike so that you can delay your start if there is a chance of inclement weather.
Hiking Mount Major is an exhilarating experience, but it requires proper preparation and safety precautions to ensure a safe, enjoyable trip. By following the tips above and staying alert while hiking, you will thoroughly enjoy the journey. Remember that hiking isn’t just about reaching the summit; it’s also about enjoying the natural environment along the way while keeping yourself safe at all times. Happy trails!
Frequently Asked Questions
What is the distance of the trail to hike Mount Major?
The distance of the Mount Major trail is approximately 3.5 miles round trip, with an elevation gain of around 1,150 feet. This may vary slightly depending on the specific trailhead you start from and any detours you take along the way.
Multiple sources confirm this information, including AllTrails and the New Hampshire State Parks website. In fact, the State Parks website even recommends allowing for 2-3 hours to complete the hike, indicating that the distance and elevation gain are not insignificant.
Of course, hiking time can vary greatly based on individual fitness level, experience, and preferences for breaks or scenery stops. So while there is a definite distance to be walked on the Mount Major trail, the overall experience will depend on each person’s unique journey.
What is the level of difficulty for hiking Mount Major?
The level of difficulty for hiking Mount Major largely depends on your fitness level and the trail you choose to take. While the mountain has several trails, one of the most popular is the Mount Major Trail which is a little over 3 miles round trip and gains about 1,150 feet in elevation.
According to the website AllTrails, the Mount Major Trail is rated as moderate in terms of difficulty due to some steep inclines and rocky terrain. However, if you’re an experienced hiker or in good physical shape, this hike may not be too challenging for you.
On the other hand, if you’re new to hiking or haven’t been active lately, it’s important to take your time and stay hydrated during this journey. You can also consider taking a less strenuous trail such as the Brook Trail which is a shorter and more gradual route up the mountain.
In summary, hiking Mount Major is moderate in difficulty but can be adjusted based on your experience level and chosen route. It provides stunning views of Lake Winnipesaukee as well as a great opportunity to exercise while enjoying nature.
What are some tips for hikers planning to hike Mount Major?
If you’re planning to hike Mount Major, the first thing to consider is your fitness level. As per the National Parks Service, “you should be in good physical condition and be prepared for steep trails with varying terrain.” So before you attempt this 3.8-mile round trip, ensure you have been exercising regularly.
Secondly, make sure you pack well. According to Appalachian Trail Conservancy, carrying a fully-stocked backpack increases calorie expenditure by 25%, which can lead to fatigue earlier than expected. So avoid overpacking your backpack! I would also recommend bringing plenty of water and high-energy snacks to keep yourself hydrated and fueled throughout the hike.
Thirdly, check the weather conditions beforehand as it can make or break your hiking experience. New Hampshire has notoriously unpredictable weather patterns. A sunny day may turn into a downpour in no time. So it’s better to be prepared for all possibilities.
Lastly, don’t forget your basic hiking etiquette! Some of these include taking only photos and leaving only footsteps behind, staying on marked paths, and respecting wildlife.
Following these tips will help ensure that you have a successful hike up Mount Major while also protecting the environment around you.
What are the different trails available for hiking Mount Major, and how do their lengths vary?
When it comes to hiking Mount Major, there are a few different trails for outdoor enthusiasts to choose from. The most popular and well-known route is the Mount Major Trail, which is 3.4 miles round-trip and takes about 2-3 hours to complete. This trail is the shortest and quickest way to reach the summit.
Another option is the Brook Trail, which measures 4.3 miles round-trip and takes about 3-4 hours to complete. This trail is a bit longer than the Mount Major Trail, but it offers more scenic views along the way.
Lastly, there’s the Boulder Loop Trail, which stretches for 3.8 miles round-trip and takes around 2-3 hours to complete. This trail is slightly less strenuous than the others, making it a great choice for families with children or novice hikers.
So, as you can see, the length of each trail varies slightly, with the Mount Major Trail being the shortest and quickest while the Brook and Boulder Loop Trails offer a bit more distance and scenery. No matter which path you choose, hiking Mount Major promises stunning views and a fantastic workout to boot!
Is there a recommended time of day to start hiking Mount Major?
Yes, there is definitely a recommended time of day to start hiking Mount Major. The ideal time to begin your hike is early in the morning – around 6 am or 7 am. This is because the temperatures are cooler, and you can avoid the crowds that tend to accumulate later in the day.
Furthermore, it’s important to note that the summit of Mount Major can get very crowded, especially in peak season. In fact, according to data from the New Hampshire Division of Parks and Recreation, Mount Major sees an average of over 250,000 hikers per year! That’s a lot of people on one mountain. If you want a quieter experience with fewer people on the trails, starting early will help you achieve that.
Another factor to consider when deciding when to start your hike is weather. New Hampshire is notorious for its rapidly changing weather patterns, and summits like Mount Major can be particularly affected by sudden changes in temperature or precipitation. By starting your hike early in the morning, you give yourself more time to complete the trail before any potential bad weather rolls in.
All things considered, if you’re planning on hiking Mount Major, the best advice is clear: set your alarm clock and get an early start!